Exposing services
The kubectl expose command creates a service for existing pods.
A service is a stable address for a pod or deployment.
A service is always required to make an external connection, and once created, kube-dns will allow us to resolve it by name (i.e. after creating service hello, the name hello will resolve to something).
Basic service types
- ClusterIP (default type)
- A virtual IP address is allocated for the service (in an internal, private range), which is reachable only from within the cluster (nodes and pods). Code can connect to the service using the original port number.
- NodePort
- A port is allocated for the service (by default, in the 30000-32768 range) that port is made available on all our nodes and anybody can connect to it. Code must be configured to connect to that new port number
- LoadBalancer
- An external load balancer is allocated for the service, and sends traffic to a
NodePort. - ExternalName
- The DNS entry managed by
kube-dnswill just be a CNAME to a provided record. No port, no IP address, no nothing else is allocated.
Exposing a port
The docker container gzynda/sleepy-server serves a webpage on a specified port after sleeping a specified number of seconds.
The configuration file sleepy.yaml creates a deployment and exposes it outside the cluster on port 80.
It then creates the sleepy-svc service to expose port 80 of the deployment to the outside world.
1 2 3 4 5 6 7 8 9 10 11 12 13 14 15 16 17 18 19 20 21 22 23 24 25 26 27 28 29 30 31 32 33 34 35 | apiVersion: apps/v1
kind: Deployment
metadata:
name: sleepy
spec:
selector:
matchLabels:
app: sleepy-server
replicas: 1
template:
metadata:
labels:
app: sleepy-server
spec:
containers:
- name: sleepy-server
image: gzynda/sleepy-server:latest
command: ["sleepy-server.py"]
args: ["-p","80"]
ports:
- containerPort: 80
---
apiVersion: v1
kind: Service
metadata:
name: sleepy-svc
labels:
app: sleepy
spec:
type: LoadBalancer
ports:
- protocol: TCP
port: 80
selector:
app: sleepy-server
|
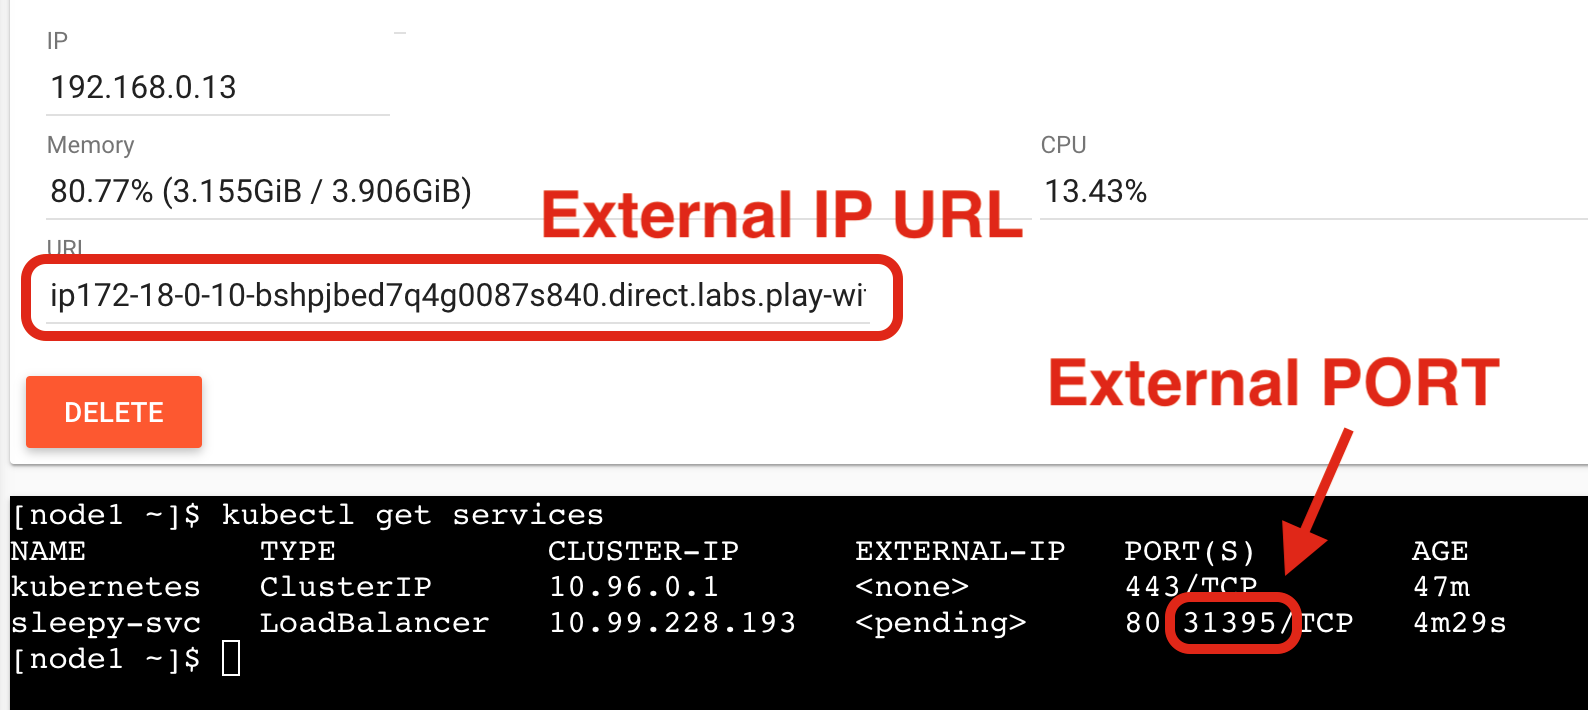
Get the external port of your deployment by listing your available services and looking for the (second) port after 80.

Paste both the URL and PORT into your web browser in the URL:PORT format to view the running webpage from this deployment.
You’ll notice that the webpage displays the name of the host it is being served from, sleeps for half a second, and then finishes printing “Hello World!”. If the page takes around half a second to complete loading every time it is requested, how many pages can be served per second?
We can confirm this by stress-testing the web server with seige using 1 worker (-c1), 0 delay (-d0), and 10 tries (-r10).
I recommend running the docker container directly for this use case.
$ docker run --rm -t yokogawa/siege -d0 -r10 -c1 [node2 IP]:[external PORT]

** SIEGE 3.0.5
** Preparing 1 concurrent users for battle.
The server is now under siege..      done.

Transactions:                     10 hits
Availability:                 100.00 %
Elapsed time:                   5.02 secs
Data transferred:               0.00 MB
Response time:                  0.50 secs
Transaction rate:               1.99 trans/sec
Throughput:                     0.00 MB/sec
Concurrency:                    1.00
Successful transactions:          10
Failed transactions:               0
Longest transaction:            0.51
Shortest transaction:           0.50
Which should confirm that the deployment can serve ~2 responses per second, since it sleeps for half a second when rendering the page.
Scaling the web server
Assuming we want more people to enjoy our sleepy server, you can serve more concurrent requests by scaling up the deployment.
kubectl scale --replicas=2 deployment.apps/sleepy
The LoadBalancer will automatically balance the traffic between pods.
If you refresh the webpage, you should notice that the host name periodically changes.
You should also see an increased transaction rate if you re-run siege. Just be sure to increase the number of concurrent users to at least 3.
$ docker run --rm -t yokogawa/siege -d0 -r10 -c3 [node2 IP]:[external PORT]

** SIEGE 3.0.5
** Preparing 3 concurrent users for battle.
The server is now under siege..      done.

Transactions:                     30 hits
Availability:                 100.00 %
Elapsed time:                   9.04 secs
Data transferred:               0.00 MB
Response time:                  0.87 secs
Transaction rate:               3.32 trans/sec
Throughput:                     0.00 MB/sec
Concurrency:                    2.89
Successful transactions:          30
Failed transactions:               0
Longest transaction:            1.51
Shortest transaction:           0.50
Try scaling up the server to more replicas and benchmarking your transaction rate again.